Create a DV with a group
Charon is in a beta state and should be used with caution according to its Terms of Use.
This quickstart guide will walk you through creating a Distributed Validator Cluster with a number of other node operators.
Pre-requisites
- A basic knowledge of Ethereum nodes and validators.
- Ensure you have git installed.
- Ensure you have docker installed.
- Make sure
dockeris running before executing the commands below.
Step 1: Generate an ENR
In order to prepare for a distributed key generation ceremony, you need to create an ENR for your charon client. This ENR is a public/private key pair that allows the other charon clients in the DKG to identify and connect to your node. If you are creating a cluster but not taking part as a node operator in it, you can skip this step.
# Clone the repo
git clone https://github.com/ObolNetwork/charon-distributed-validator-node.git

# Change directory
cd charon-distributed-validator-node/

# Use docker to create an ENR. Backup the file `.charon/charon-enr-private-key`.
docker run --rm -v "$(pwd):/opt/charon" obolnetwork/charon:v0.19.1 create enr
You should expect to see a console output like this:
Created ENR private key: .charon/charon-enr-private-key
enr:-JG4QGQpV4qYe32QFUAbY1UyGNtNcrVMip83cvJRhw1brMslPeyELIz3q6dsZ7GblVaCjL_8FKQhF6Syg-O_kIWztimGAYHY5EvPgmlkgnY0gmlwhH8AAAGJc2VjcDI1NmsxoQKzMe_GFPpSqtnYl-mJr8uZAUtmkqccsAx7ojGmFy-FY4N0Y3CCDhqDdWRwgg4u
Please make sure to create a backup of the private key at .charon/charon-enr-private-key. Be careful not to commit it to git! If you lose this file you won't be able to take part in the DKG ceremony nor start the DV cluster successfully.
If instead of being shown your enr you see an error saying permission denied then you may need to update your docker permissions to allow the command to run successfully.
For the next step, select the Creator tab if you are coordinating the creation of the cluster. (This role holds no position of privilege in the cluster, it only sets the initial terms of the cluster that the other operators agree to.) Select the Operator tab if you are accepting an invitation to operate a node in a cluster proposed by the cluster creator.
Step 2: Create a cluster or accept an invitation to a cluster
- Creator
- Operator
Collect addresses, configure the cluster, share the invitation
Before starting the cluster creation process, you will need to collect an Ethereum address for each operator in the cluster. They will need to be able to sign messages through MetaMask with this address.(Broader wallet support will be added in future.) With these addresses in hand, go through the cluster creation flow.
- Launchpad
- CLI
This video shows the flow within the DV Launchpad:
The following are the steps for creating a cluster.
- Go to the DV Launchpad
- Connect your wallet

- Select
Create a Cluster with a groupthenGet Started.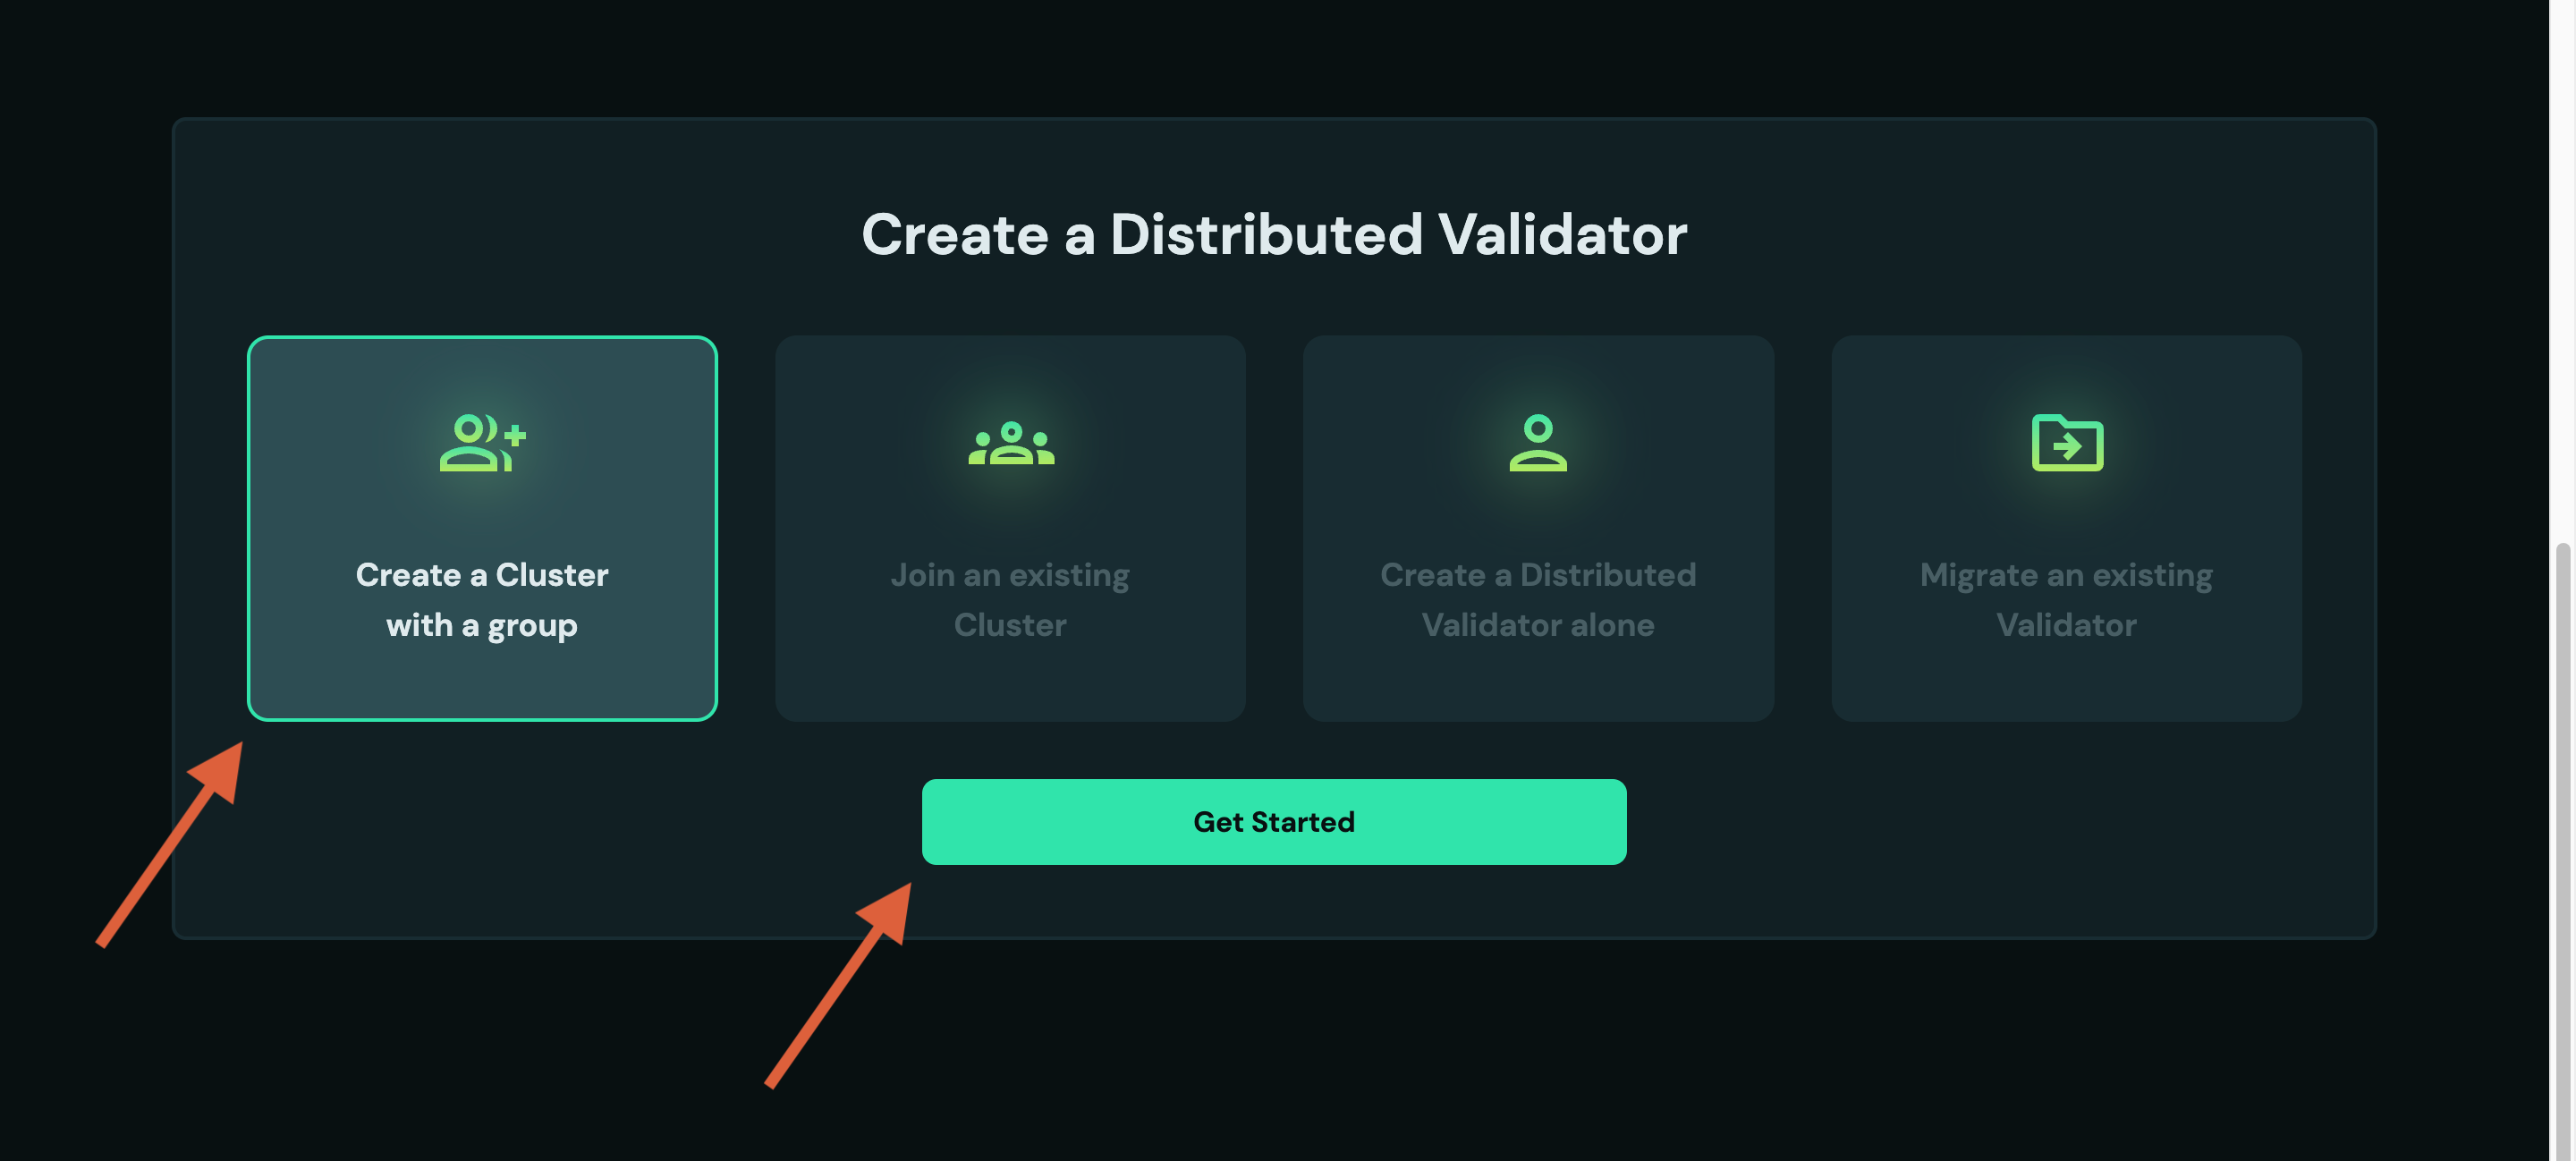
- Follow the flow and accept the advisories.
- Configure the Cluster
- Input the
Cluster Name&Cluster Size(i.e. number of operators in the cluster). The threshold will update automatically, it shows the number of nodes that need to be functioning for the validator(s) to stay active. - Input the Ethereum addresses for each operator that you collected previously. If you will be taking part as an operator, click the "Use My Address" button for Operator 1.
- Select the desired amount of validators (32 ETH each) the cluster will run. (Note that the mainnet launchpad is restricted to one validator for now.)
- If you are taking part in the cluster, enter the ENR you generated in step one in the "What is your charon client's ENR?" field.
- Enter the
Principal addresswhich should receive the principal 32 ETH and the accrued consensus layer rewards when the validator is exited. This can optionally be set to the contract address of a multisig / splitter contract. - Enter the
Fee Recipient addressto which the execution layer rewards will go. This can be the same as the principal address, or it can be a different address. This can optionally be set to the contract address of a multisig / splitter contract. - Click
Create Cluster Configuration. Review that all the details are correct, and pressConfirm and SignYou will be prompted to sign two or three transactions with your MetaMask wallet. These are: - The
config_hash. This is a hashed representation of the details of this cluster, to ensure everyone is agreeing to an identical setup. - The
operator_config_hash. This is your acceptance of the terms and conditions of participating as a node operator. - Your
ENR. Signing your ENR authorises the corresponding private key to act on your behalf in the cluster. - Share your cluster invite link with the operators. Following the link will show you a screen waiting for other operators to accept the configuration you created.
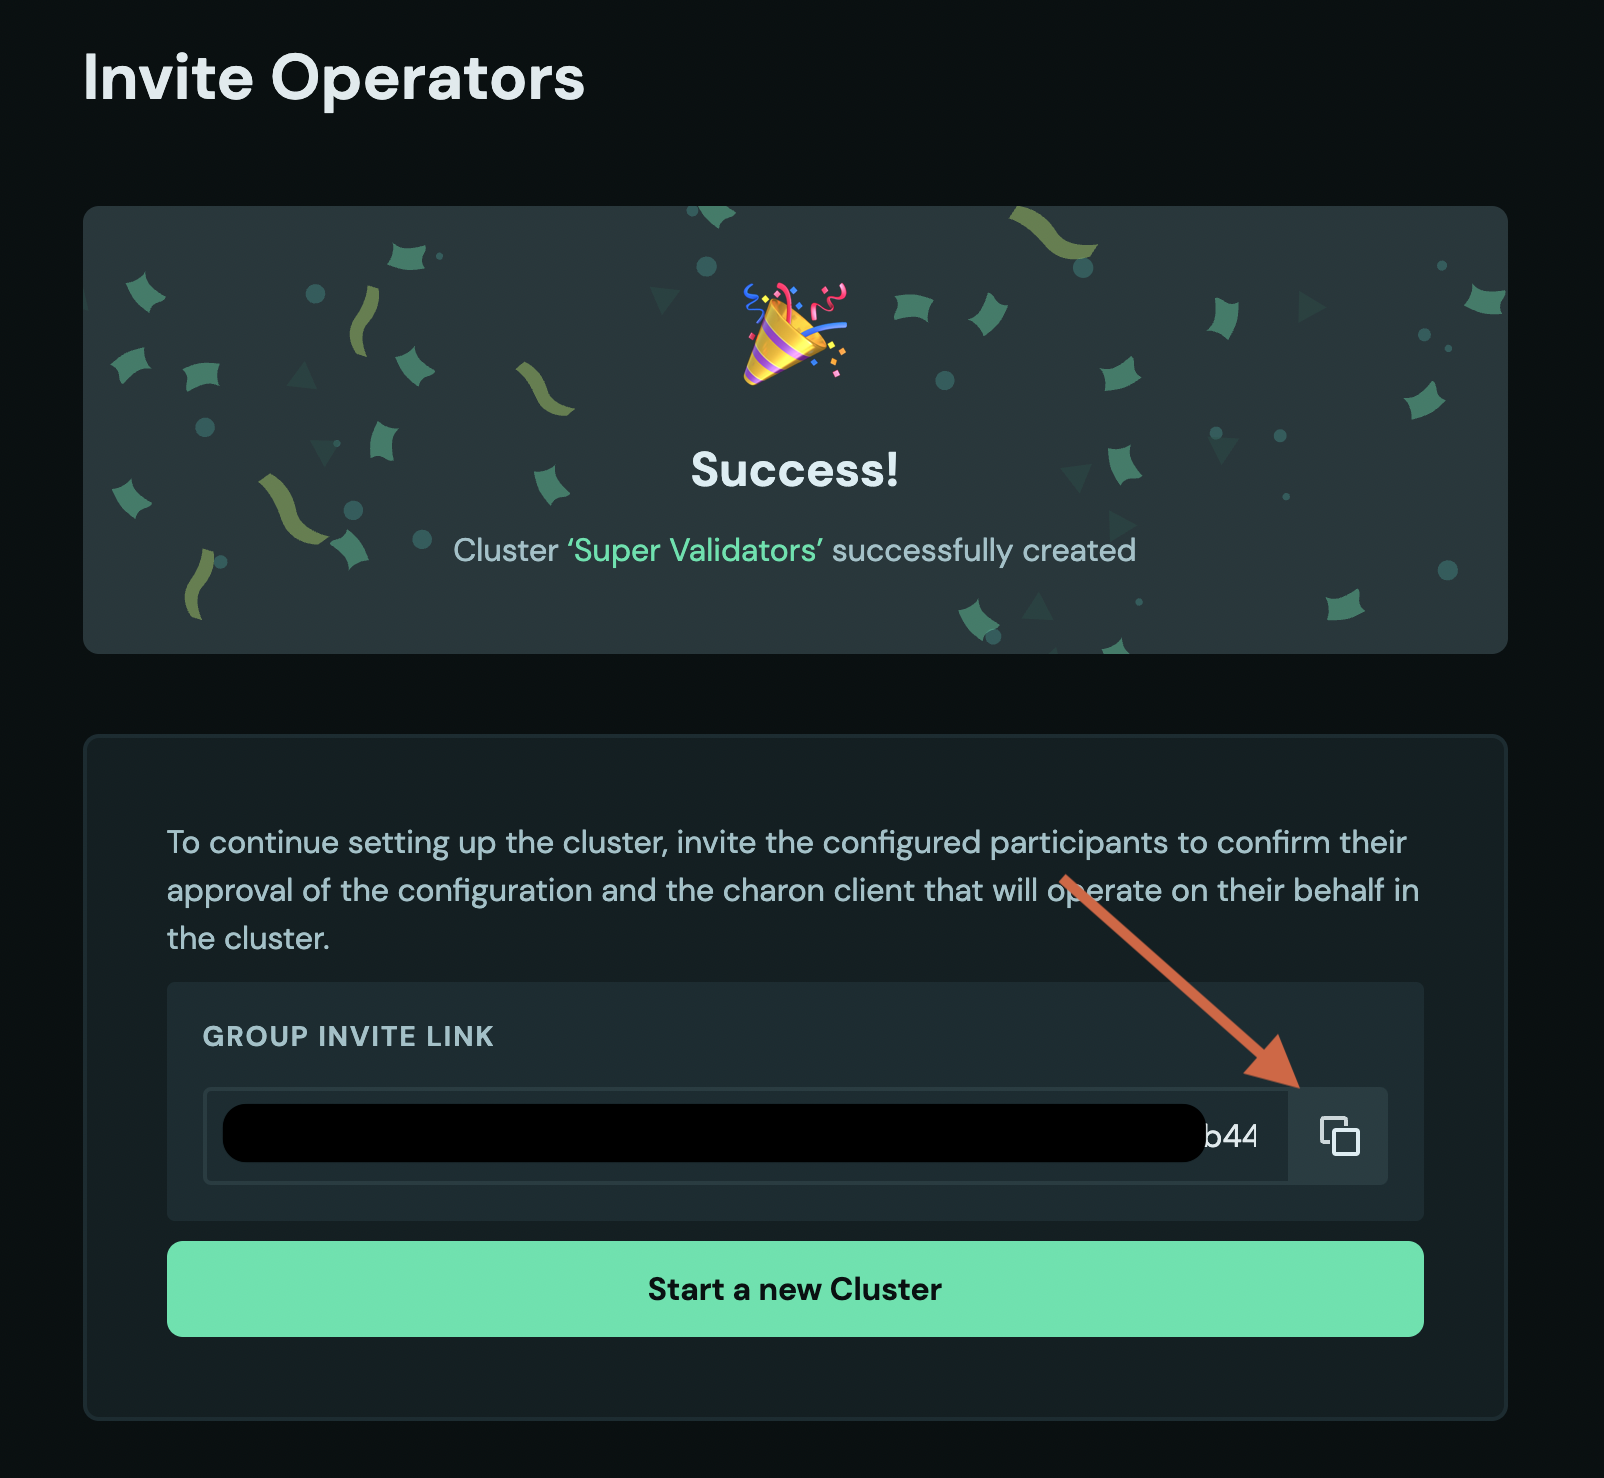
- You can use the link to monitor how many of the operators have already signed their approval of the cluster configuration and submitted their ENR.
You will use the CLI to create the cluster definition file, which you will distribute it to the operators manually.
- The leader or creator of the cluster will prepare the
cluster-definition.jsonfile for the Distributed Key Generation ceremony using thecharon create dkgcommand. - Populate the
charon create dkgcommand with the appropriate flags including thename, thenum-validators, thefee-recipient-addresses, thewithdrawal-addresses, and theoperator-enrsof all the operators participating in the cluster. - Run the
charon create dkgcommand that generates DKG cluster-definition.json file. (Note: in the "docker run" command, you may have to change the version from v0.19.0 to the correct version of the repo you are using)This command should output a file atdocker run --rm -v "$(pwd):/opt/charon" obolnetwork/charon:v0.19.0 create dkg --name="Quickstart" --num-validators=1 --fee-recipient-addresses="0x0000000000000000000000000000000000000000" --withdrawal-addresses="0x0000000000000000000000000000000000000000" --operator-enrs="enr:-JG4QGQpV4qYe32QFUAbY1UyGNtNcrVMip83cvJRhw1brMslPeyELIz3q6dsZ7GblVaCjL_8FKQhF6Syg-O_kIWztimGAYHY5EvPgmlkgnY0gmlwhH8AAAGJc2VjcDI1NmsxoQKzMe_GFPpSqtnYl-mJr8uZAUtmkqccsAx7ojGmFy-FY4N0Y3CCDhqDdWRwgg4u".charon/cluster-definition.jsonThis file needs to be shared with the other operators in a cluster.- The
.charonfolder is hidden by default. To view it, runls -al .charonin your terminal. Else, if you are onmacOS, pressCmd + Shift + .to view all hidden files in the finder application.
- The
Join the cluster prepared by the creator
Use the Launchpad or CLI to join the cluster configuration generated by the creator:- Launchpad
- CLI
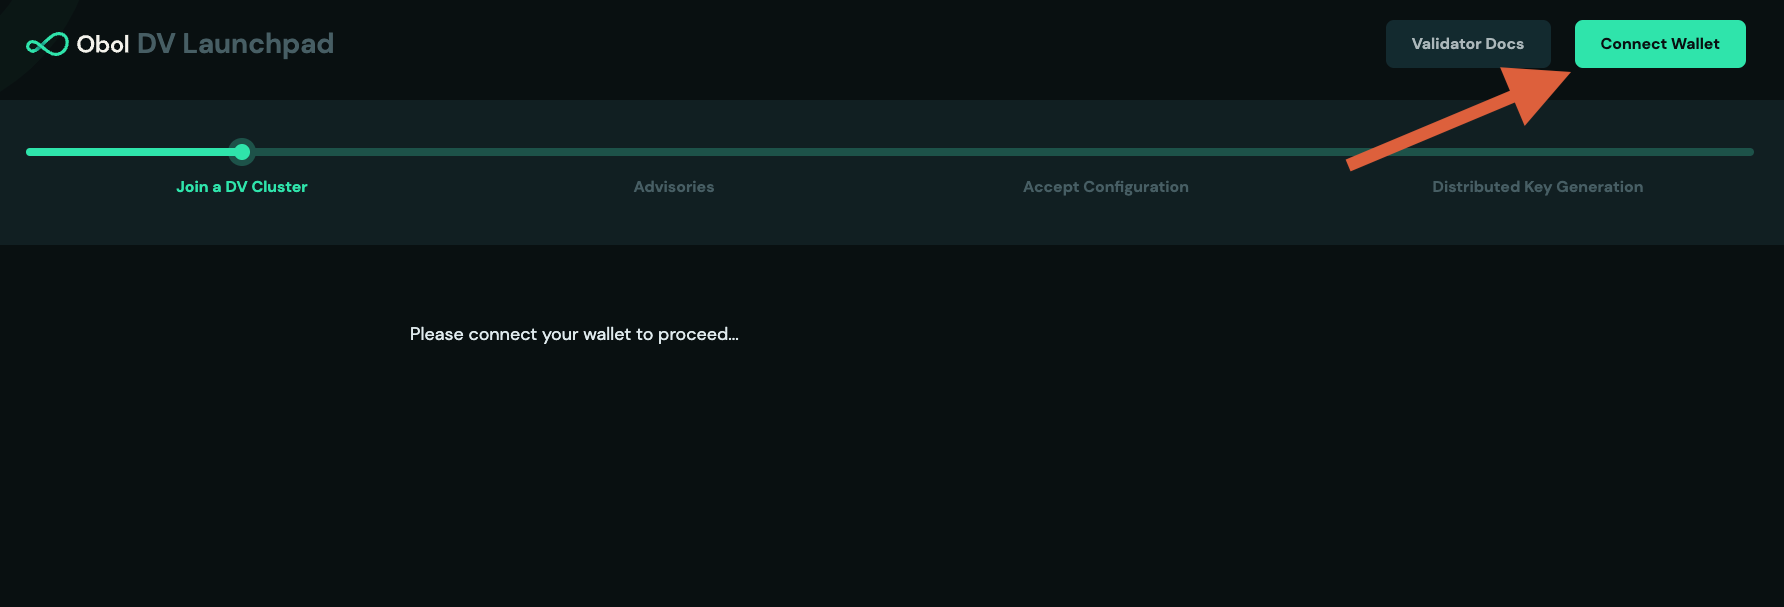
- Click on the DV launchpad link provided by the leader or creator. Make sure you recognise the domain and the person sending you the link, to ensure you are not being phished.
- Connect your wallet using the Ethereum address provided to the leader.
- Review the operators addresses submitted and click
Get Startedto continue.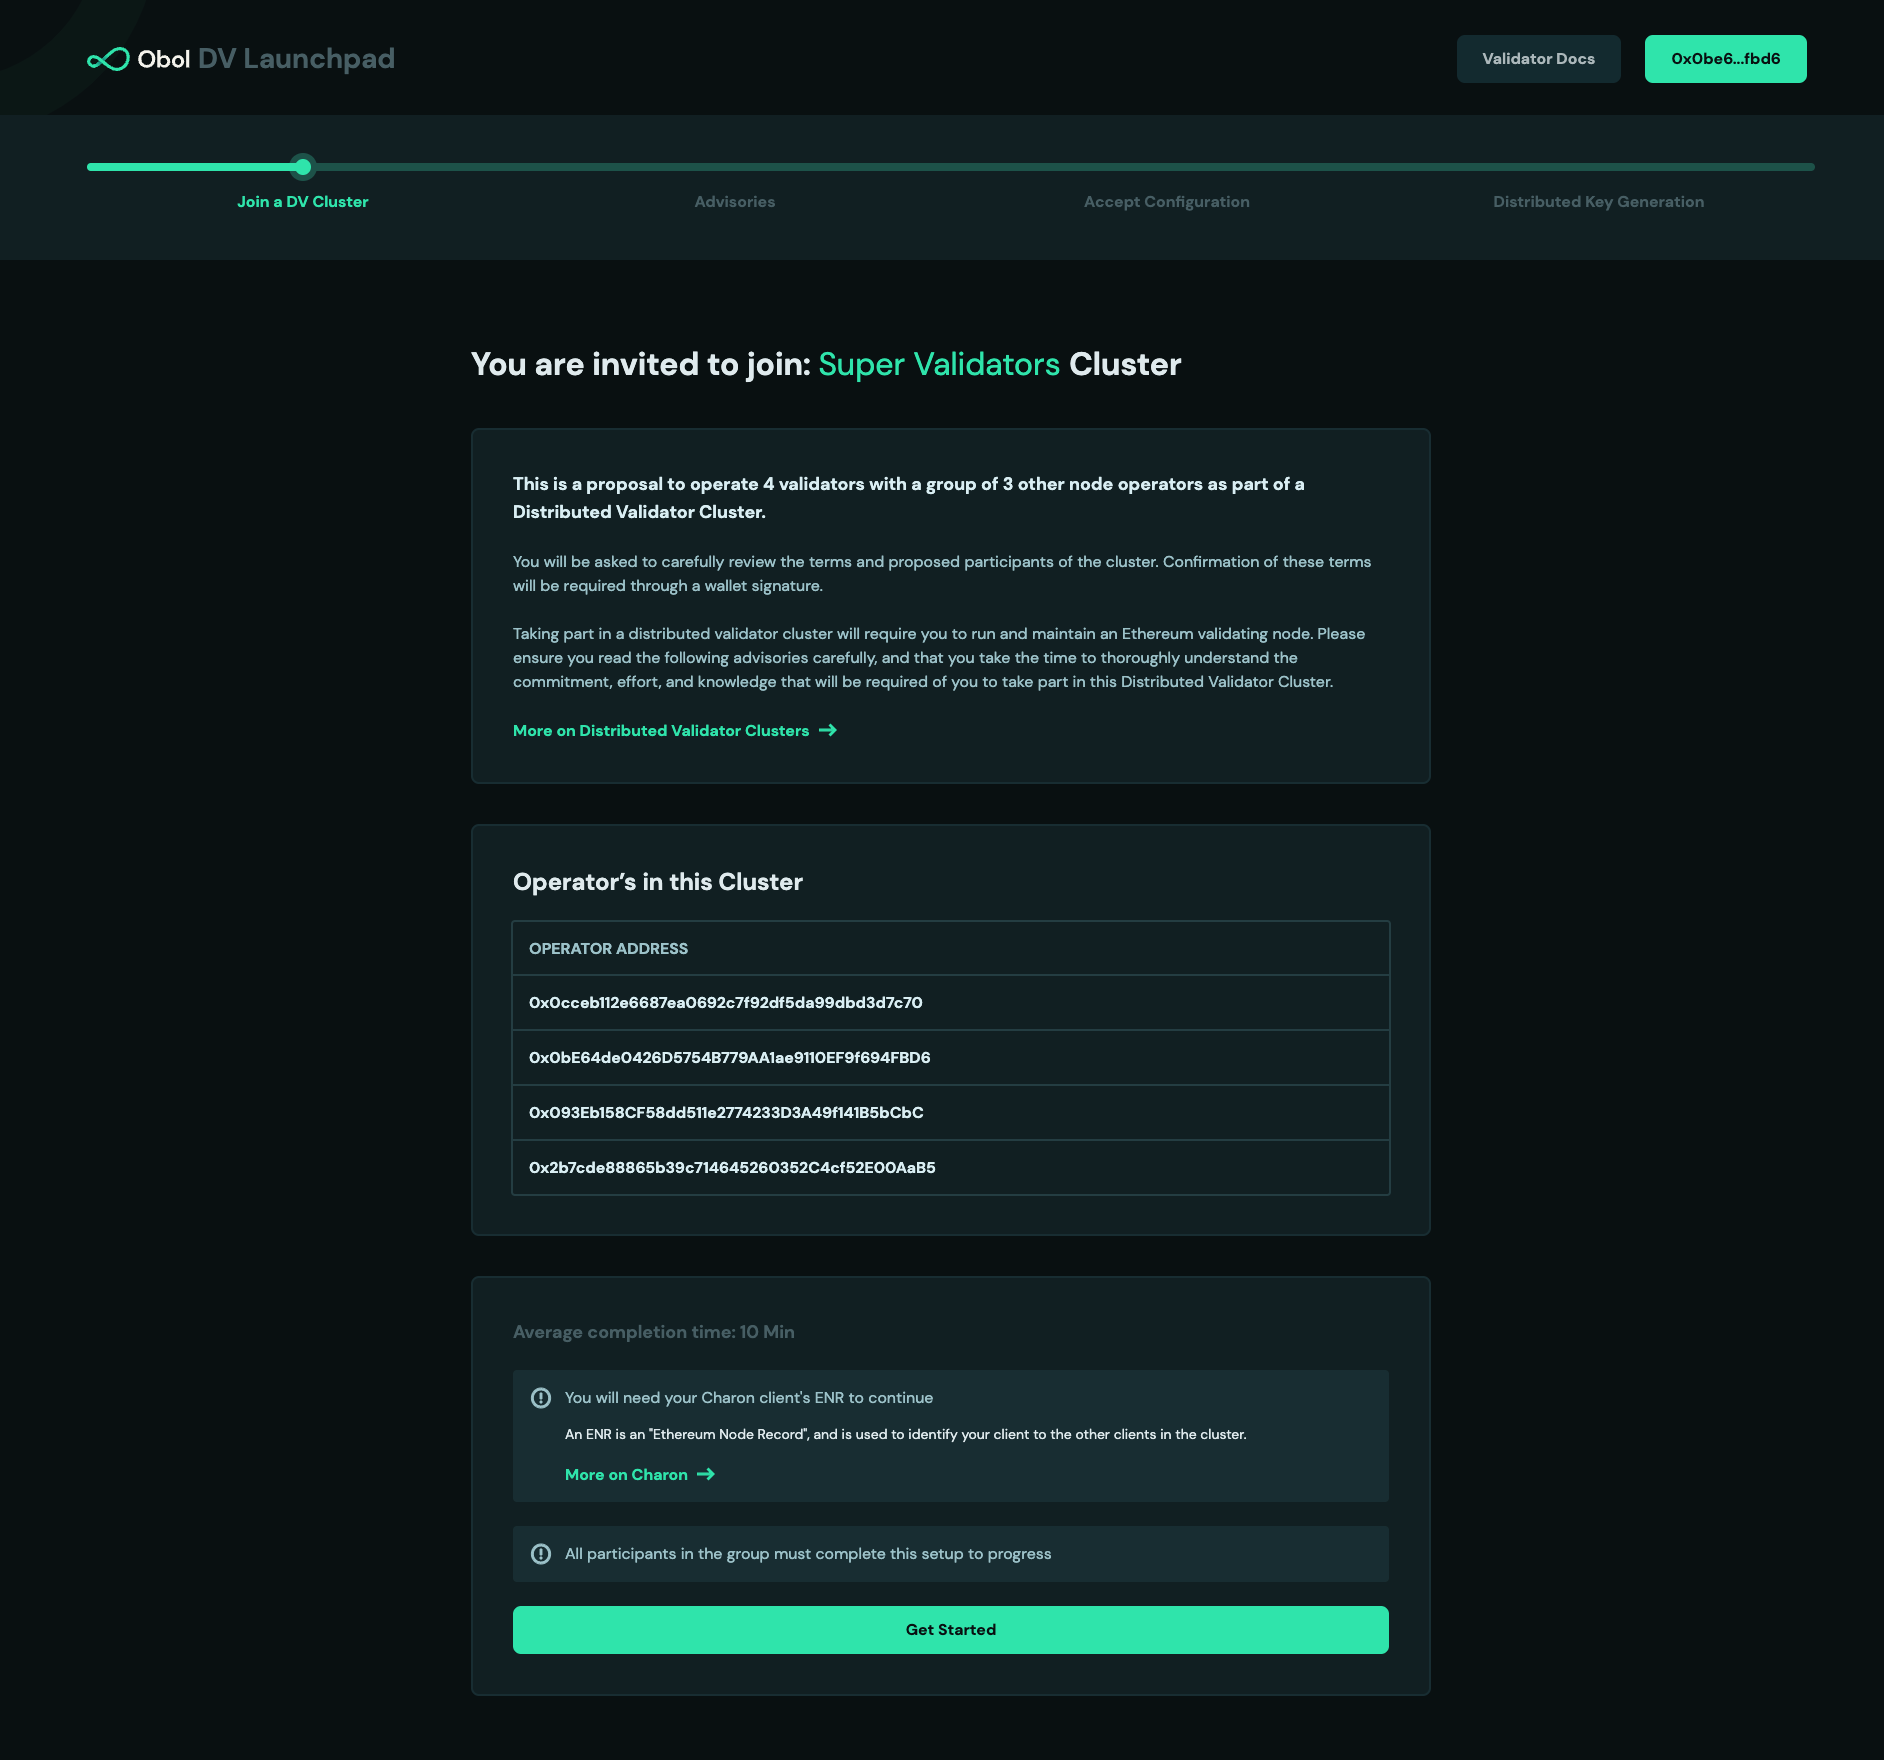
- Review and accept the DV Launchpad terms & conditions and advisories.
- Review the cluster configuration set by the creator and add your
ENRthat you generated in step 1.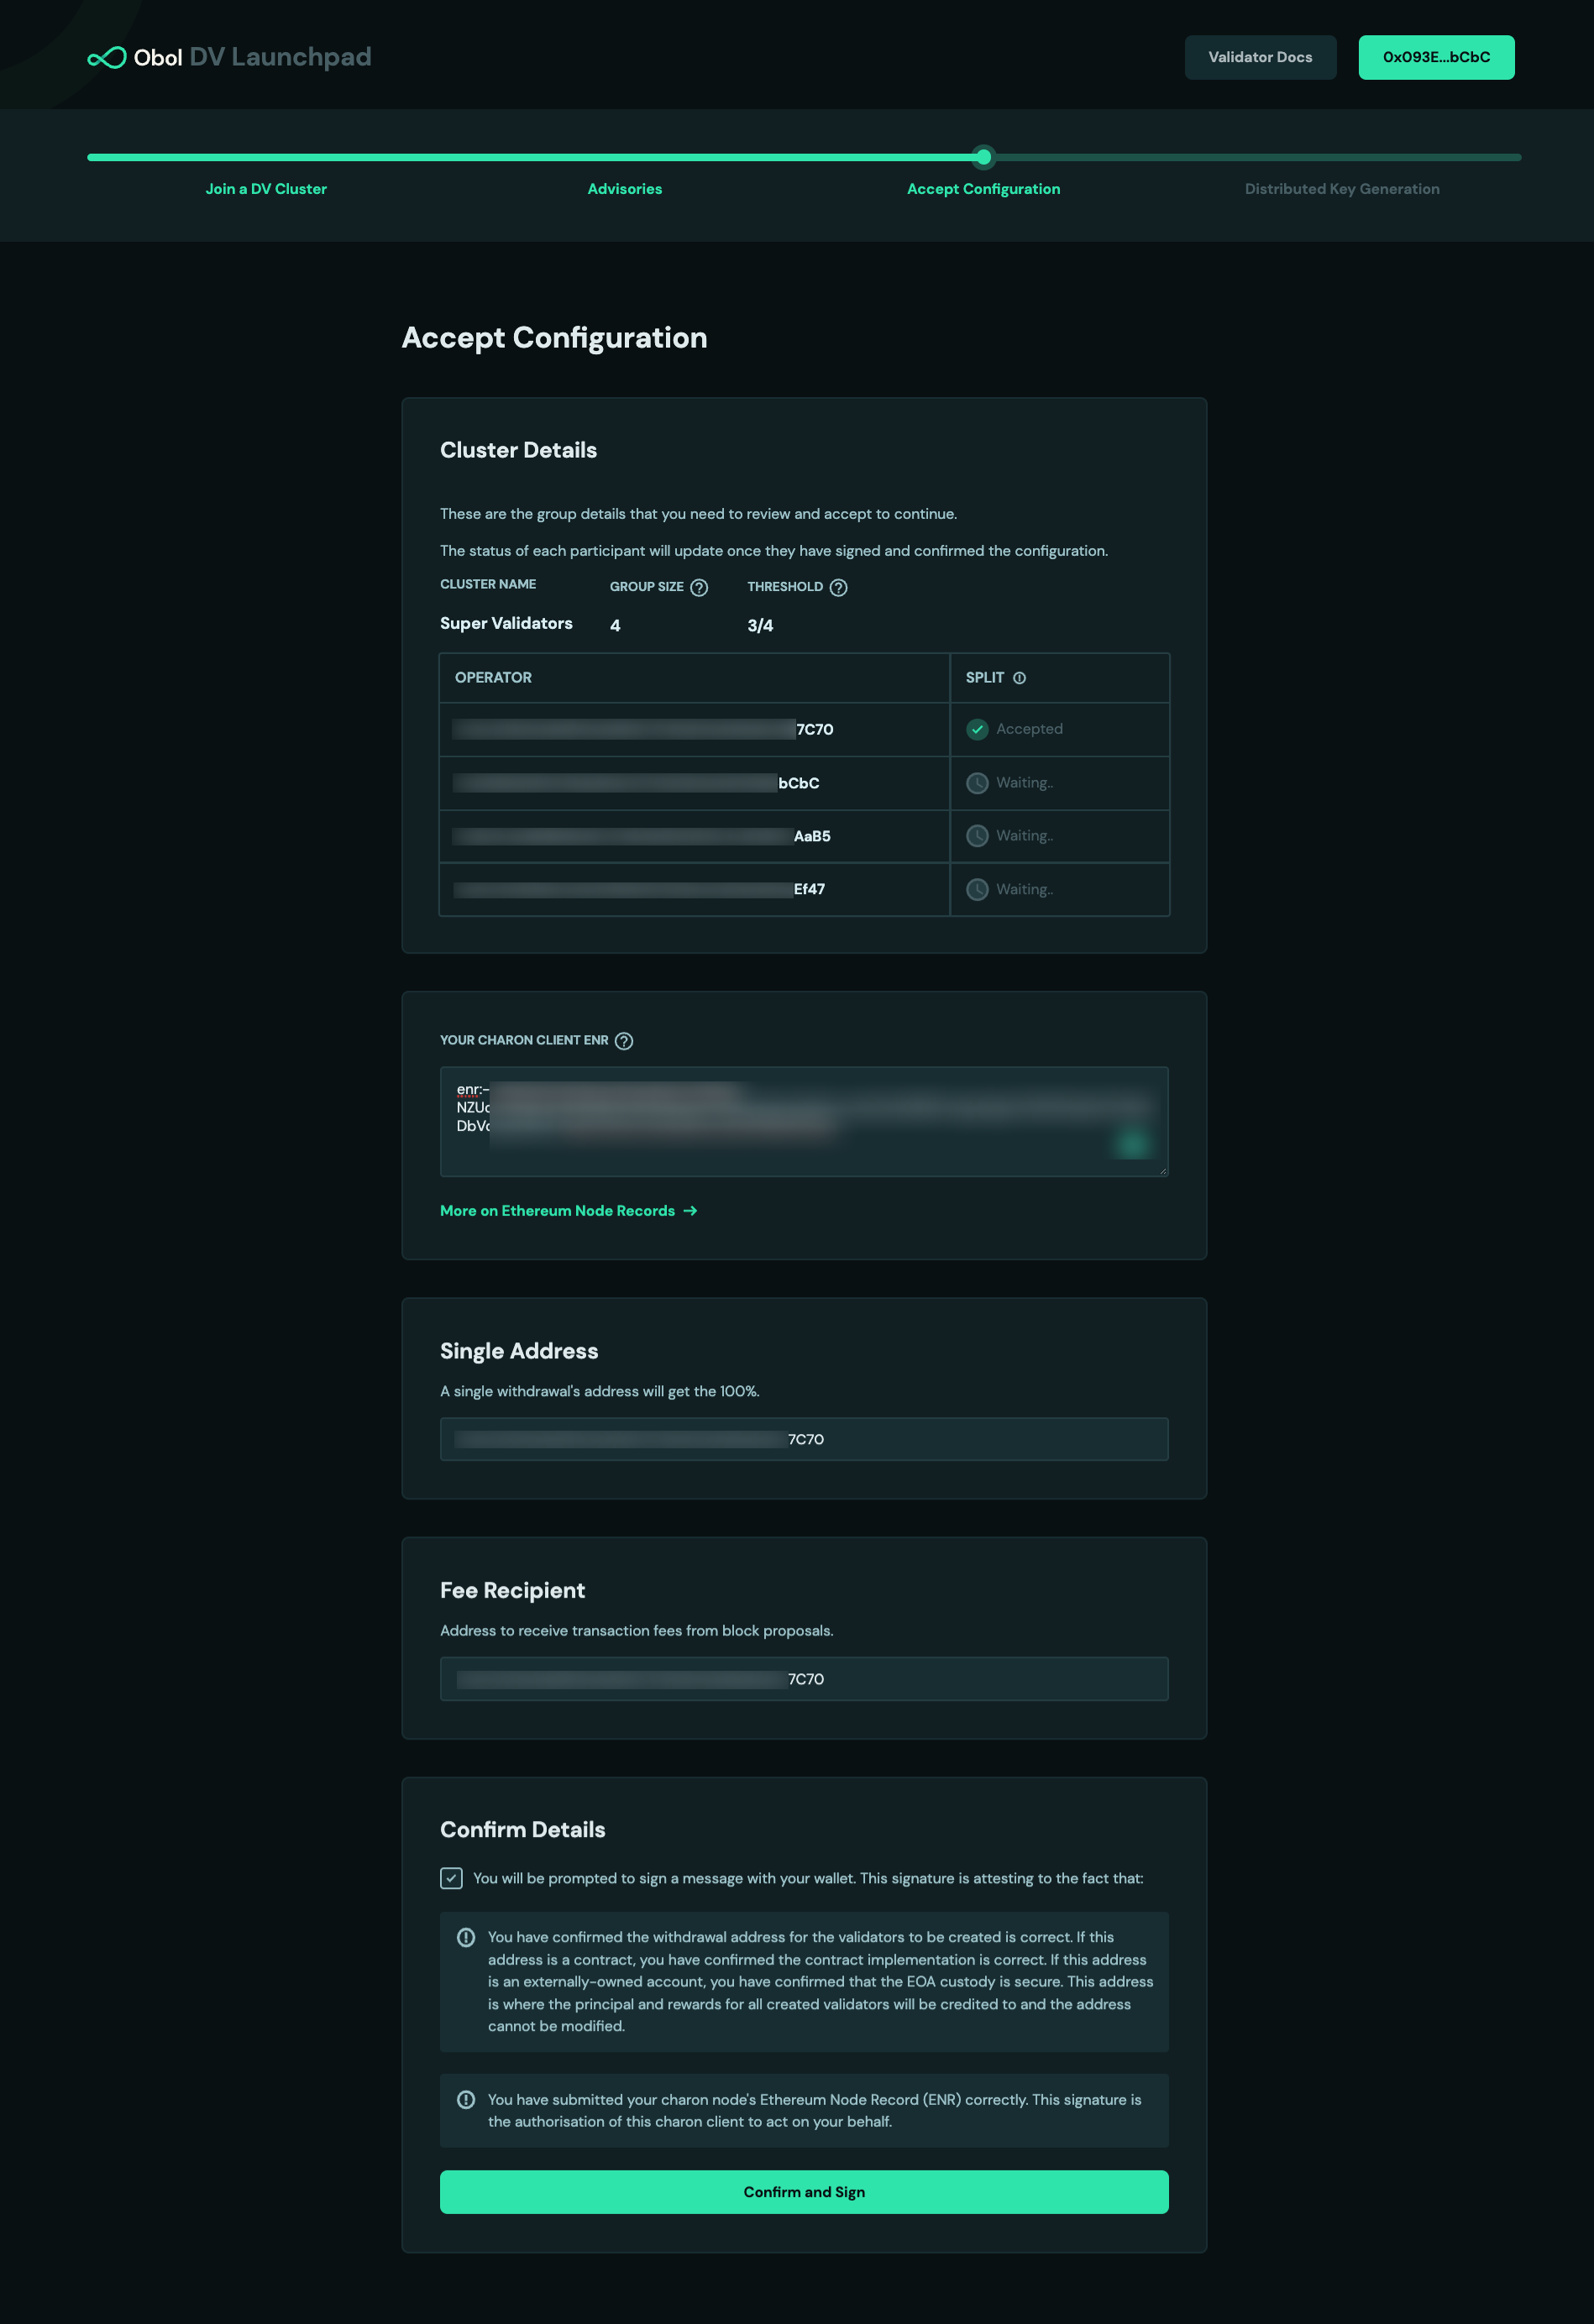
- Sign the two transactions with your wallet, these are:
- The config hash. This is a hashed representation of all of the details for this cluster.
- Your own
ENRThis signature authorises the key represented by this ENR to act on your behalf in the cluster. - Wait for all the other operators in your cluster to also finish these steps.
cluster-definition.json file created by the leader/creator. You should save it in the .charon/ folder that was created initially. (Alternatively, you can use the --definition-fileflag to override the default expected location for this file.)Once every participating operator is ready, the next step is the distributed key generation amongst the operators.
- If you are not planning on operating a node, and were only configuring the cluster for the operators, your journey ends here. Well done!
- If you are one of the cluster operators, continue to the next step.
Step 3: Run the Distributed Key Generation (DKG) ceremony
For the DKG to complete, all operators need to be running the command simultaneously. It helps if operators can agreed on a certain time or schedule a video call for them to all run the command together.
- Launchpad
- CLI
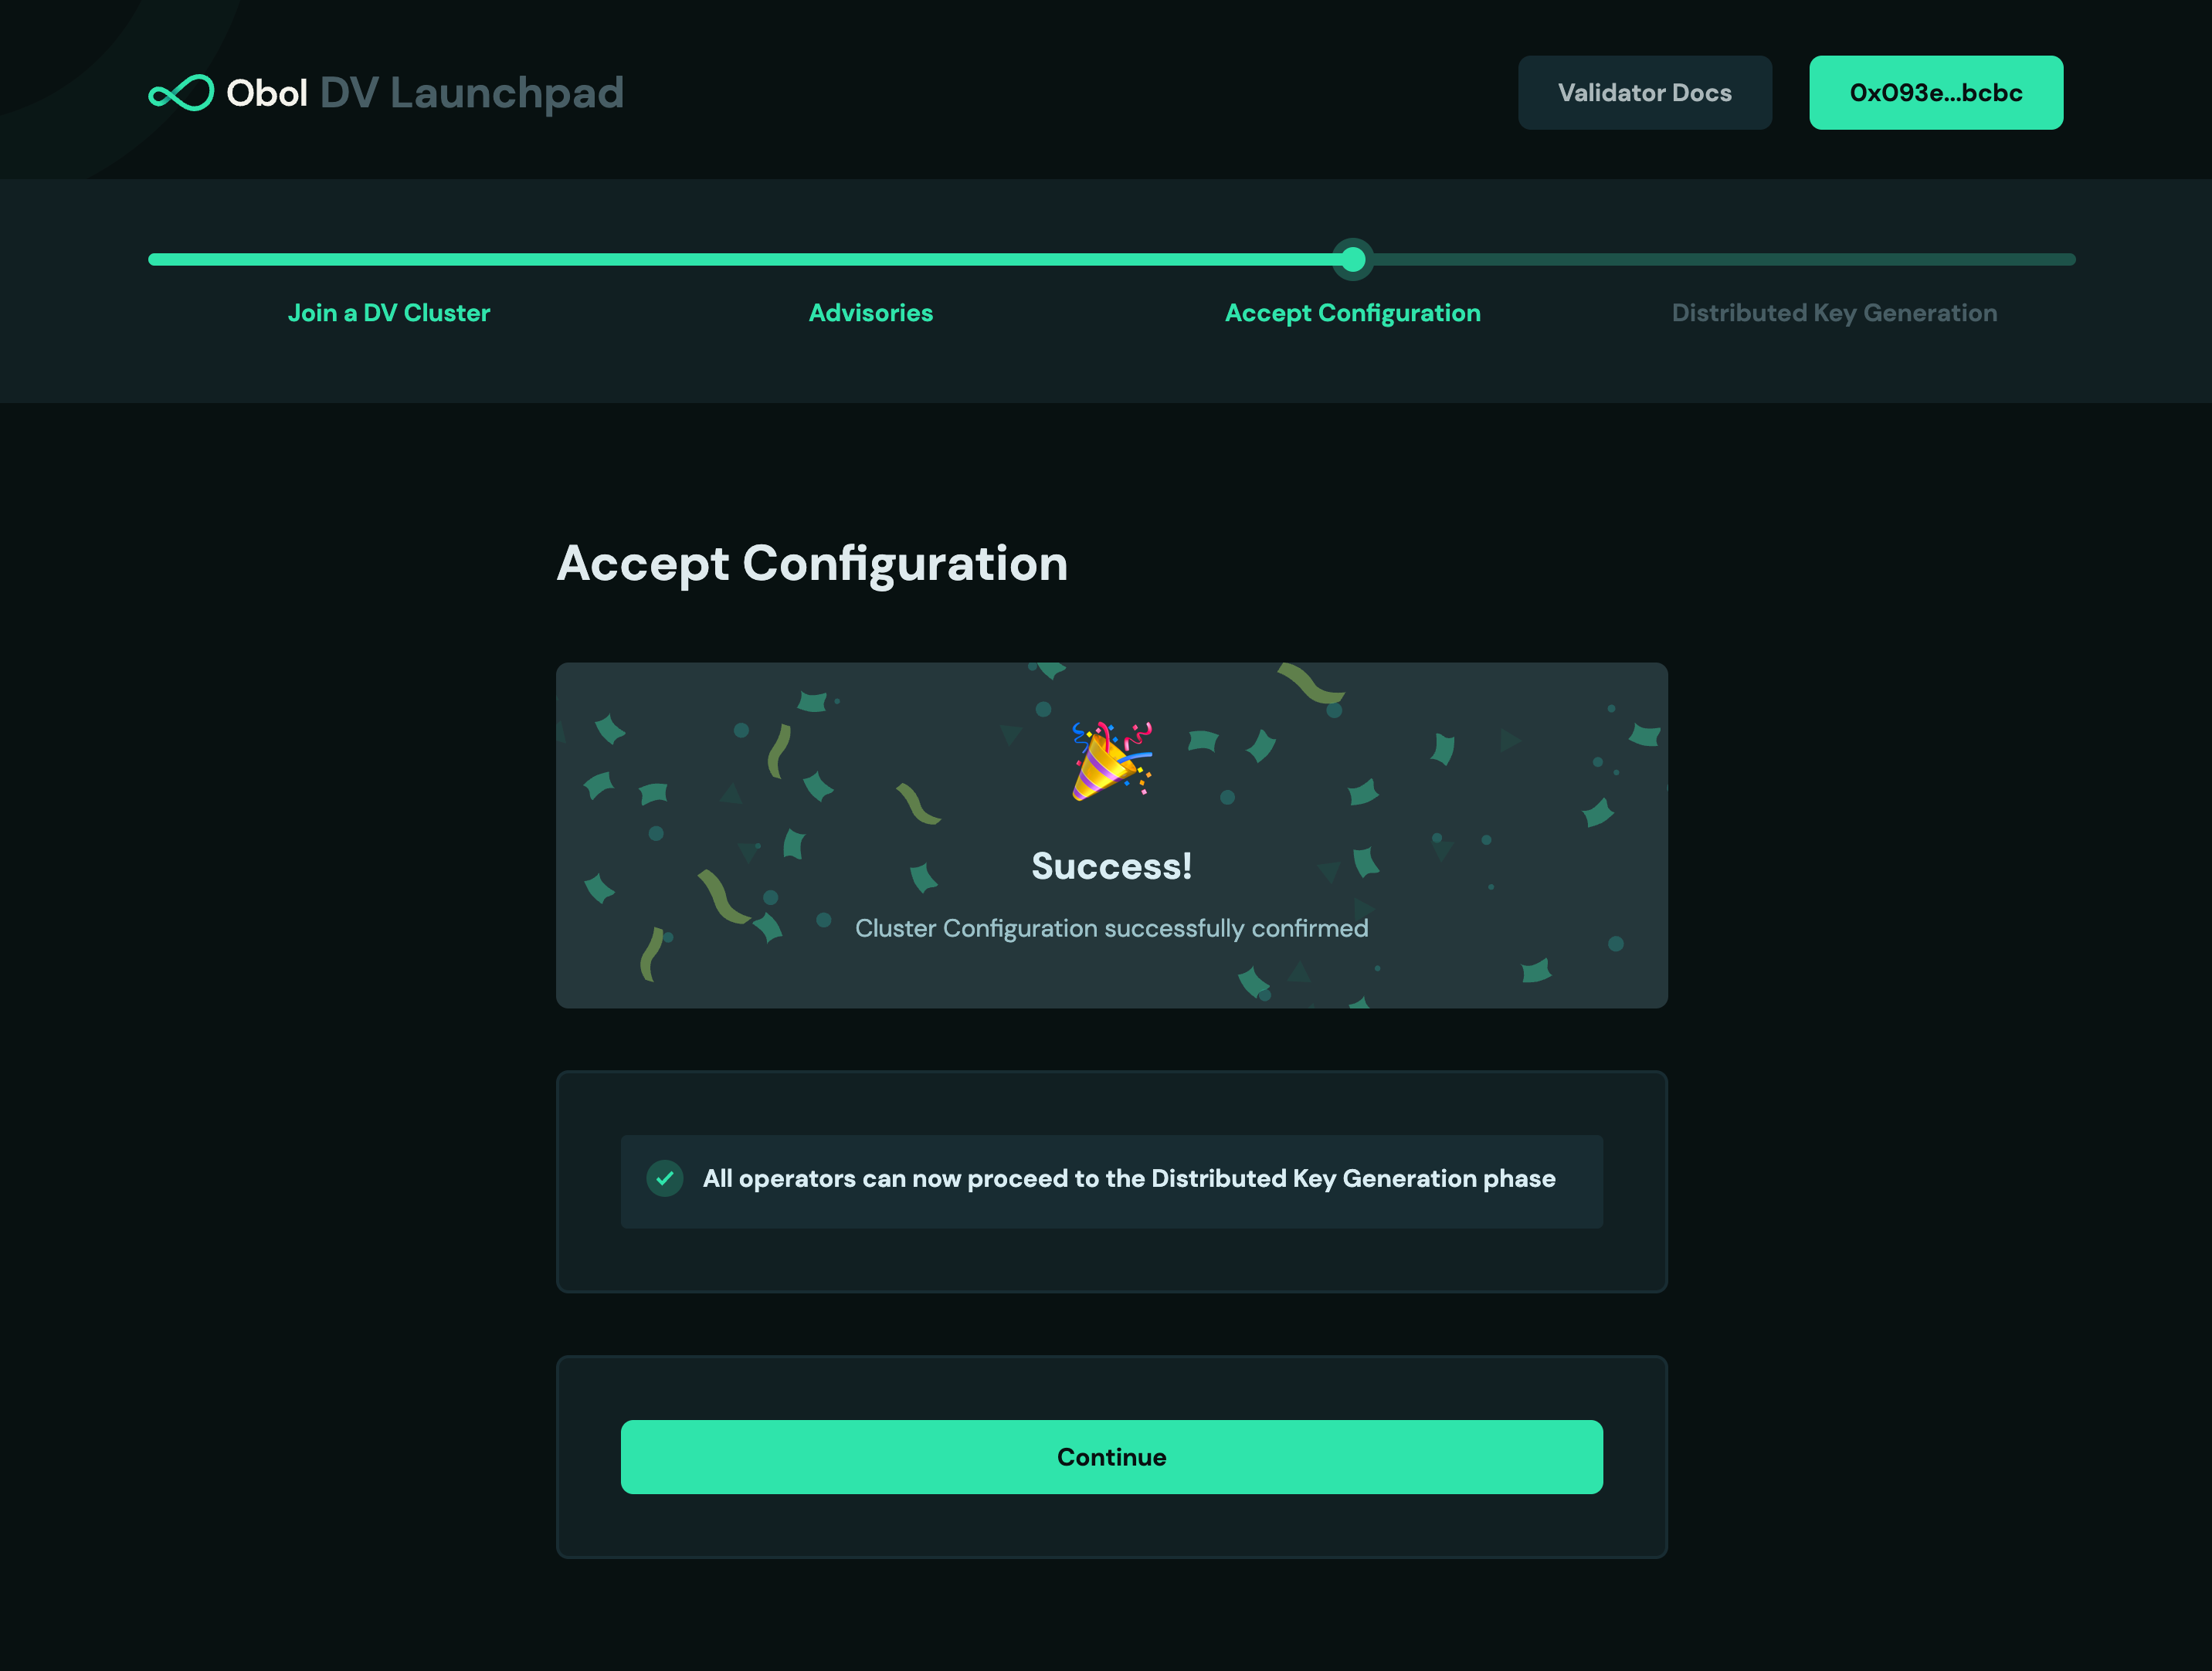
- Once all operators successfully signed, your screen will automatically advance to the next step and look like this. Click
Continue. (If you closed the tab, you can always go back to the invite link shared by the leader and connect your wallet.)
Copy and run the
dockercommand on the screen into your terminal. It will retrieve the remote cluster details and begin the DKG process.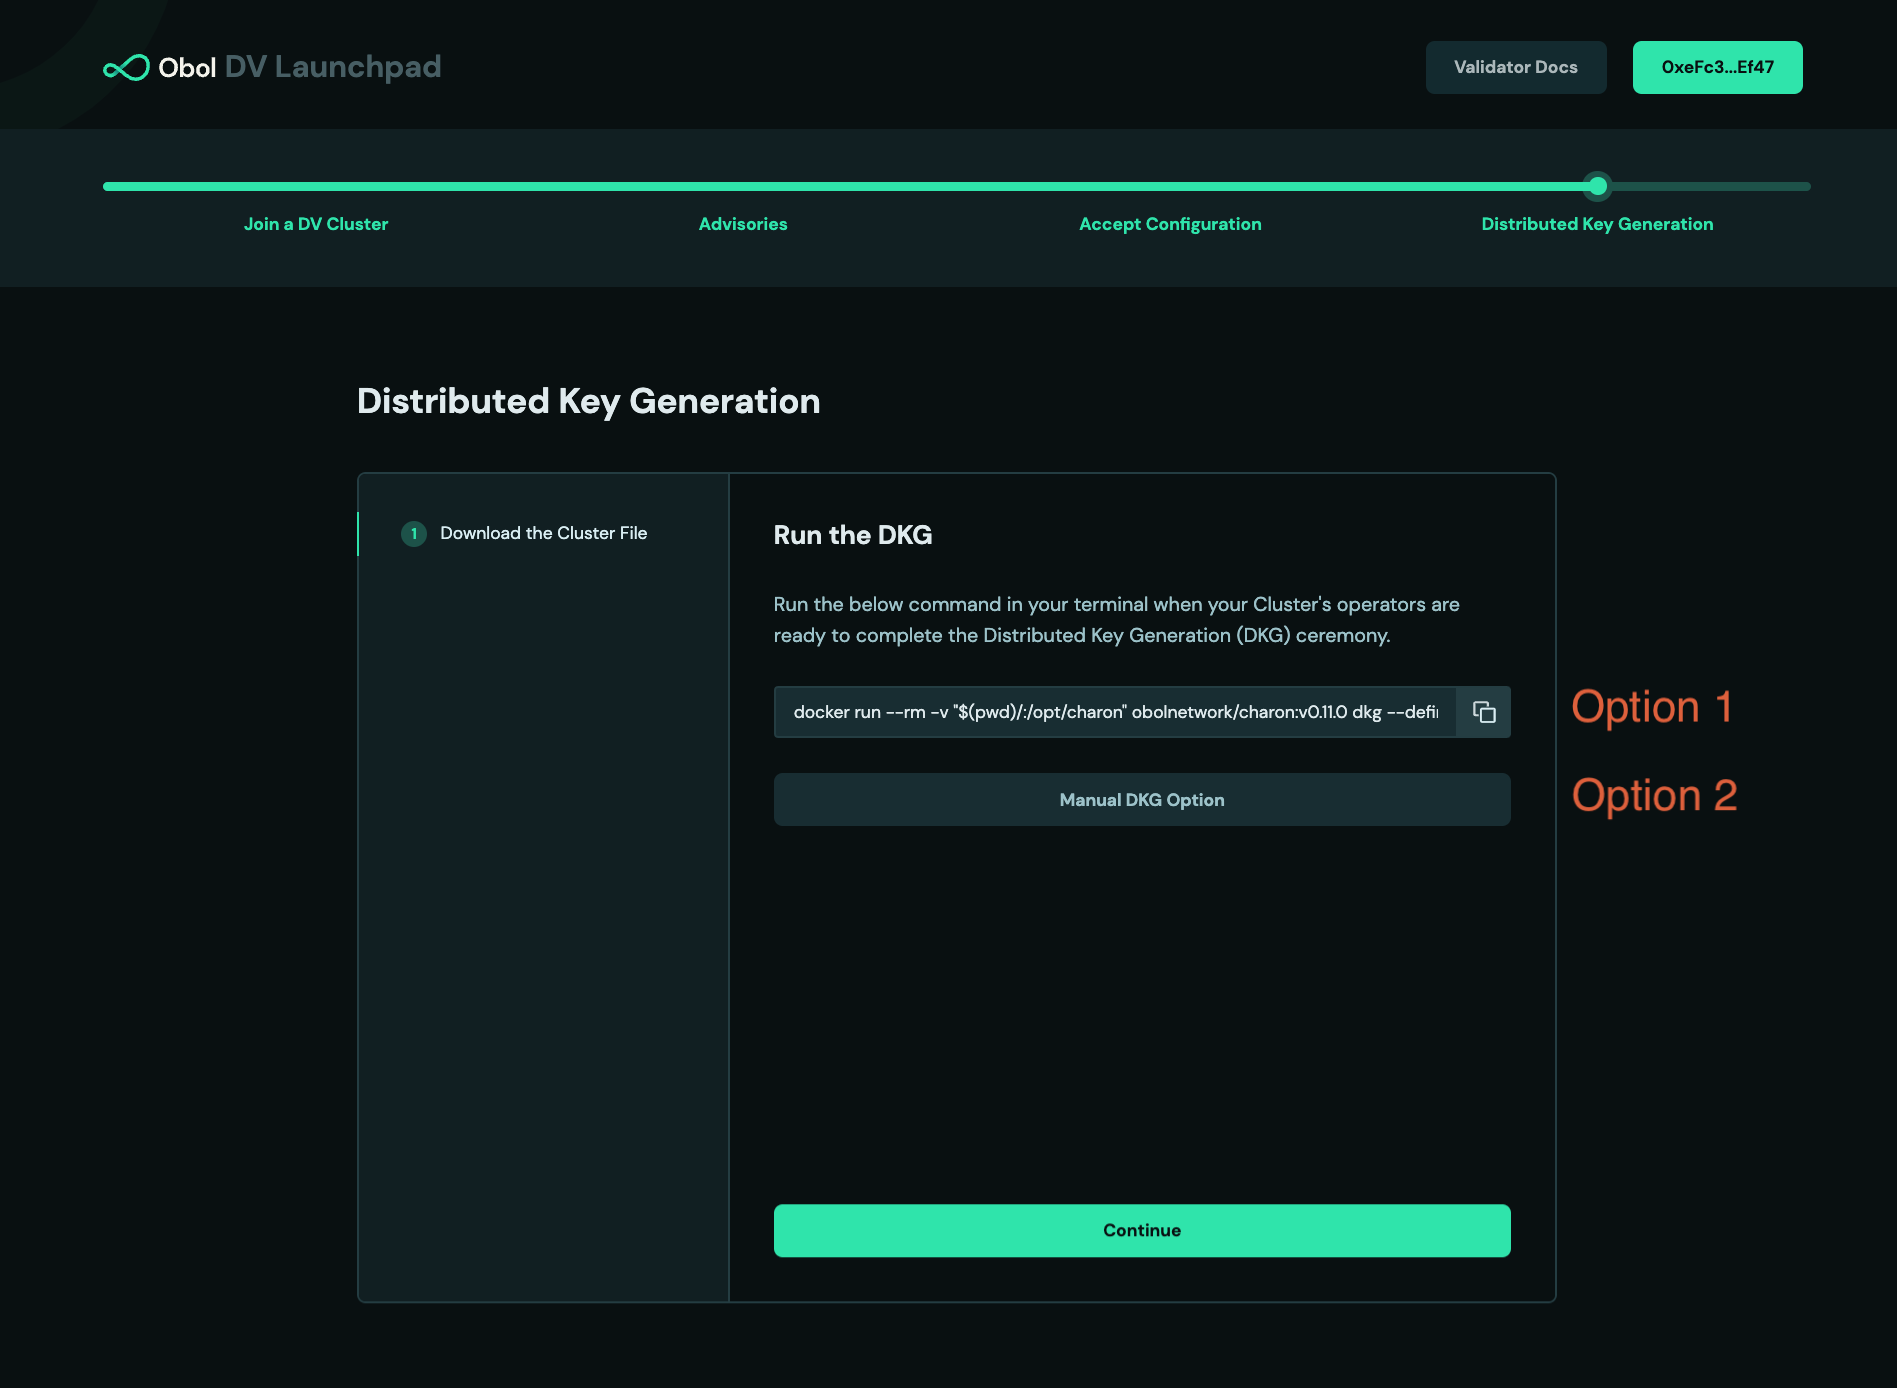
Assuming the DKG is successful, a number of artefacts will be created in the
.charonfolder of the node. These include:- A
deposit-data.jsonfile. This contains the information needed to activate the validator on the Ethereum network. - A
cluster-lock.jsonfile. This contains the information needed by charon to operate the distributed validator cluster with its peers. - A
validator_keys/folder. This folder contains the private key shares and passwords for the created distributed validators.
- A
cluster-definition.json file and you place it in a .charon subdirectory, run: docker run --rm -v "$(pwd):/opt/charon" obolnetwork/charon:v0.19.0 dkg --publish
Please make sure to create a backup of your .charon/ folder. If you lose your private keys you won't be able to start the DV cluster successfully and may risk your validator deposit becoming unrecoverable. Ensure every operator has their .charon folder securely and privately backed up before activating any validators.
The cluster-lock and deposit-data files are identical for each operator, if lost, they can be copied from one operator to another.
Now that the DKG has been completed, all operators can start their nodes.
Step 4: Start your Distributed Validator Node
With the DKG ceremony over, the last phase before activation is to prepare your node for validating over the long term.
- Full Node
- Existing Beacon Node
Nethermind) and a consensus layer client (Lighthouse). You can also leverage alternative ways to run a node such as Ansible, Helm, or Kubernetes manifests.- Docker
- Ansible
- Helm
- Kubernetes
Currently, the quickstart repo configures a node for the Holesky testnet. It is possible to choose a different network (another testnet, or mainnet) by overriding the .env file.
From within the charon-distributed-validator-node directory:
.env.sample is a sample environment file that allows overriding default configuration defined in docker-compose.yml. Uncomment and set any variable to override its value.
Setup the desired inputs for the DV, including the network you wish to operate on. Check the Charon CLI reference for additional optional flags to set.
# Copy ".env.sample", renaming it ".env"
cp .env.sample .env
If you manually update docker compose to mount lighthouse from your locally synced ~/.lighthouse, the whole chain database may get deleted. It'd be best not to manually update as lighthouse checkpoint-syncs so the syncing doesn't take much time.
Note: If you have a nethermind node already synced, you can simply copy over the directory. For ex: cp -r ~/.ethereum/goerli data/nethermind. This makes everything faster since you start from a synced nethermind node.
# Delete lighthouse data if it exists
rm -r ./data/lighthouse

# Spin up a Distributed Validator Node with a Validator Client
docker compose up -d
If at any point you need to turn off your node, you can run:
# Shut down the currently running distributed validator node
docker compose down
You should use the grafana dashboard that accompanies the quickstart repo to see whether your cluster is healthy.
# Open Grafana dashboard
open http://localhost:3000/d/singlenode/
In particular you should check:
- That your charon client can connect to the configured beacon client.
- That your charon client can connect to all peers directly.
- That your validator client is connected to charon, and has the private keys it needs loaded and accessible.
Most components in the dashboard have some help text there to assist you in understanding your cluster performance.
You might notice that there are logs indicating that a validator cannot be found and that APIs are returning 404. This is to be expected at this point, as the validator public keys listed in the lock file have not been deposited and acknowledged on the consensus layer yet (usually ~16 hours after the deposit is made).
Using a pre-existing beacon node
Using a remote beacon node will impact the performance of your Distributed Validator and should be used sparingly.
If you already have a beacon node running somewhere and you want to use that instead of running an EL (nethermind) & CL (lighthouse) as part of the example repo, you can disable these images. To do so, follow these steps:
- Copy the
docker-compose.override.yml.samplefile
cp -n docker-compose.override.yml.sample docker-compose.override.yml
- Uncomment the
profiles: [disable]section for bothnethermindandlighthouse. The override file should now look like this
services:
  nethermind:
    # Disable nethermind
    profiles: [disable]
    # Bind nethermind internal ports to host ports
    #ports:
      #- 8545:8545 # JSON-RPC
      #- 8551:8551 # AUTH-RPC
      #- 6060:6060 # Metrics

  lighthouse:
    # Disable lighthouse
    profiles: [disable]
    # Bind lighthouse internal ports to host ports
    #ports:
      #- 5052:5052 # HTTP
      #- 5054:5054 # Metrics
...
- Then, uncomment and set the
CHARON_BEACON_NODE_ENDPOINTSvariable in the.envfile to your beacon node's URL
...
# Connect to one or more external beacon nodes. Use a comma separated list excluding spaces.
CHARON_BEACON_NODE_ENDPOINTS=<YOUR_REMOTE_BEACON_NODE_URL>
...
- Restart your docker compose
docker compose down
docker compose up -d
In a Distributed Validator Cluster, it is important to have a low latency connection to your peers. Charon clients will use the NAT protocol to attempt to establish a direct connection to one another automatically. If this doesn't happen, you should port forward charon's p2p port to the public internet to facilitate direct connections. (The default port to expose is :3610). Read more about charon's networking here.
If you have gotten to this stage, every node is up, synced and connected, congratulations. You can now move forward to activating your validator to begin staking.